Showing posts with label Crafts. Show all posts

Saturday, February 11, 2012

Mixing It Up


I have a secret love.  Well, maybe not so secret.  Wanna know who?  It's my stand mixer. 

We go way back.  It was a wedding present.  I've used it probably twice a week - or more - since I first opened the box.  It turns out lovely cakes and every more lovely icings.  It mixes up regular batches of chocolate chip cookies, and less regular loaves of bread.  It mashes potatoes, whips cream, and even shreds cheese. 


Funny story: when Jonathan and I got married and this beauty went on our registry, we had a long discussion about what color it should be.  Jonathan imagined that I would want a pink one.  (I was thinking red, but we were in love and trying to work hard at compromising, so I didn't say so at the time.)  He thought stainless steel would look nice in any kitchen - and match the toaster over, besides.

But I've always kind of wished for red.  So even before I bought my Silhouette cutter last fall, I knew that this was going to be one of my first projects: to add a splash of color to my mixer. 


The hardest part was choosing a design.  Inspired by this, I chose a kitchen utensil theme. 

It's cute.  It's red.  (It's cleaner than it has been since I took it out of the box that first time.)  It's dying to mix up some chocolate chip cookie dough, so I'd better start measuring some ingredients...

Monday, December 19, 2011

The Nutcracker: Peg Doll Style


Intrigued?  You should be.  This is really cool.  But you need just a little back story first, so hang in there...

After Hannah's ballet recital, our house has officially been hit with Nutcracker fever.  We recorded the PBS special of The Nutcracker Ballet on Live from Lincoln Center last week, and our three year old child has watched the whole thing (including the intermission interview done by Chelsea Clinton) literally as many times a day as we will allow.  I never imagined she would sit through a full-blown theatrical production, but kids are full of surprises, aren't they?

On a seemingly unrelated note, I saw these Princess Peg Dolls on Pinterest, and I immediately knew that I needed  to make them.  Now.  For Christmas.  Or better yet, to put in the last week of the Advent Calendar.  (Yeah...that's the way my mind works.  And I wonder why nothing ever gets done.)  So on Saturday, I went to Hobby Lobby and bought some peg dolls and a little box. 

Then on Sunday, driving home from church, conversation turned, as it so often does, to Hannah's new favorite thing, her Nutcracker doll from Grandma.  Hannah was wishing that she could play with the doll.  As it is, it's reserved for looking at only, or occasional gentle handling. 

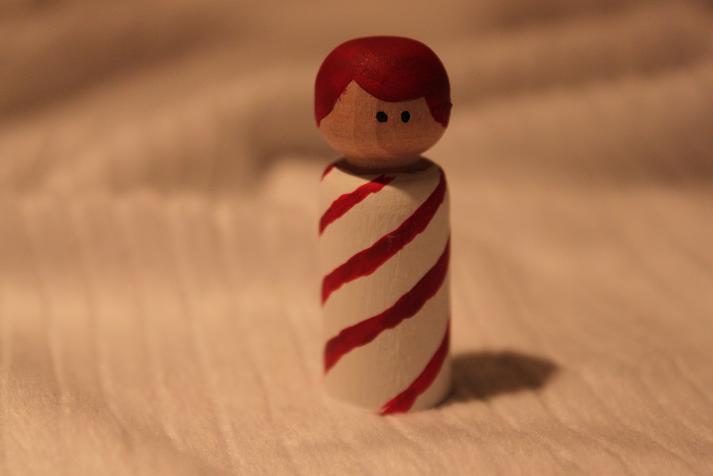
And a 10,000 watt light bulb went off!  Who needs princess peg dolls?  I could make NUTCRACKER PEG DOLLS!!!!  After a thorough Internet search, I found no examples to use for reference.  So I collected Hannah's Nutcracker story book for inspiration and got to sketching.  Using this helpful tutorial, I started painting the peg dolls last night, and finished them this morning.  Now they're all in a row, waiting for their appropriate Advent Calendar day to make their curtain call.

But since Hannah doesn't read my blog, I'll share them with you now.  And I figured, what better way to enjoy Nutcracker characters than through the story.  So at long last, here it goes:


Marie and Fritz were so excited about Christmas!  Their parents had decorated the tree, and it looked magical!


During the Christmas party, Godfather Drosselmeyer arrived with gifts for all the children. 


He brought Marie a special gift: a nutcracker doll.  Marie loved her new doll.


But naughty Fritz chased Marie, and tried to take it from her.


Late that night, after everyone had gone to bed, Marie crept downstairs to see her Nutcracker doll under the tree. But the tree grew, and the doll came to life!


Soon, a band of mice had invaded the house, and the Nutcracker was fighting with the Mouse King.


Afraid that the Nutcracker would lose the battle, Marie threw her shoe at the Mouse King


This distracted him while the Nutcracker gave the fatal blow.


The Nutcracker became a prince, and he took Marie to a magical land of snow.


They were greeted by the Sugar Plum Fairy.


She and her friends welcomed Marie and the Prince.


Each person performed a special dance, inspired by something good to eat or drink. 
First was the Dance of Tea.

Next was the Dance of Coffee.  This dancer was an acrobat, doing flips and twirls.


Then was the Candy Cane Dance.


And finally came Mother Ginger, with a band of gingerbread children in her skirt.


When it was time for Marie to return home, everyone said goodbye.


Marie awoke under the Christmas tree, and looked at her Nutcracker doll.  She wondered if it had all been a dream...


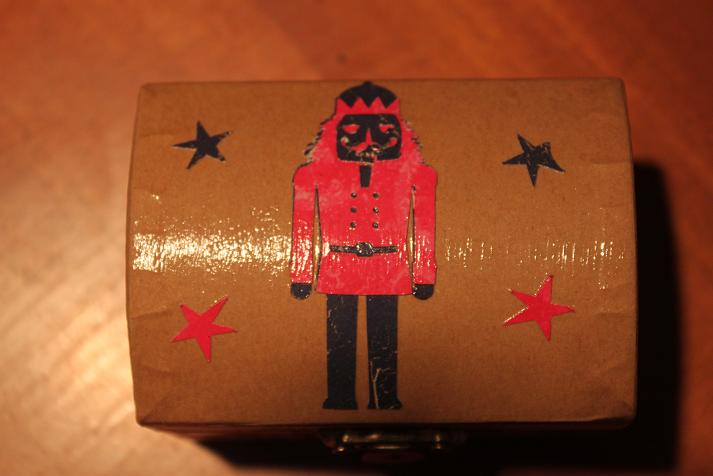
Like it?  I guess Hannah's not the only one obsessed, is she?  So I had this box to put the dolls in, and I started wondering how I could paint it.  I mean, I did okay on the peg dolls (with the exception of Fritz's lazy eye), but I'm no painted. 

Then I remembered that I just got a brand spanking new Silhouette machine.  So look what I whipped up next!

A firm believer that everyone should have stuff with their name on it (this comes from being named Siobhan, where very little exists with my name on it), I added this label. 


Now I have another reason to be excited about Christmas.  I can't wait to dole out the rest of the dolls!

Tuesday, May 3, 2011

Baby Name Banner


After my online search for the perfect purple elephant fabric, I went to the local JoAnn store and bought some fabric. As it turns out, none of it has elephants (in fact, some of it has birds), and most of it is not purple, but green. But I'm very happy with...

This fabric is destined to be throw pillows to liven up the futon that somehow found its way into Little Sister's nursery.


And this fabric is for some to-be-determined crafts, including a very cute name banner I finished today. The pattern for the banner is from a lovely book called Winsome Baby by Nancy Halvorsen.


Since Baby's name is top secret, I will not show you the whole banner, but here's a look at one of the letters, so you can get a sneak peak of what it's going to look like. (Also for those of you who are trying to figure out what the baby's name is, this will give you a small hint. As a reminder, it's a name from the Bible. I chose the letter "A" because it is intentionally obscure; this will eliminate a couple of names, but you will find that most woman's names in the Bible have the letter "A" in them...)


Next up for the nursery is painting, so we're looking forward to big changes coming soon!

Wednesday, April 6, 2011

My Friends are Crafty Too


Some of my friends gathered last night at the local Italian restaurant to enjoy a kid-free evening of pizza, pasta, cupcakes, and laughter. Lucky for two among us, the occasion was to celebrate our soon-expected babies. Let me tell you, squeezing three pregnant women into either side of a booth was a sight to see!
But I want to show off the talents of my wonderful friends, who made beautiful and thoughtful baby gifts. I brought a present for the other guest of honor, which I carried in my purse. After looking around and seeing that no one else had a gift of any kind with them, it remained there...until one crafty mama "went to the bathroom," and returned with two baskets brimming with bounty. The other baby, whose name is well known and loved, had an entirely personalized basket. But Little Sister (whom my grandpa calls NUK for Name UnKnown) was showered with gifts that cleverly said Wee Warren. Luckily, my friends are among my eight faithful readers, and made Little Sister's things in purple with elephants.

So let me brag on my crafty friends, and show you the wonderful things waiting to welcome Little Sister to the world.

Here's a wonderful wall hanging - perfect for the nursery...

...some super cute elephant thank you cards (check out Amy's website)...

...a whole crew of hand-made and embroidered burp clothes and bibs. If that didn't inspire me to finally sit down and learn how to use my embroidery machine...

...then this would! I can't wait to take pictures of the girls in these!
In fact, Hannah was only too happy to model her new Big Sis shirt.

And I can't forget to mention the made-from-scratch cupcakes, complete with scrumptious butter cream icing.

I was SO excited about these because I had spent the whole afternoon baking six dozen pineapple upside down cupcakes for church, which I couldn't eat. So you better believe I enjoyed my pretty baby pink cake!

Thanks to my wonderful friends!

Monday, March 28, 2011

Eggs-N-String: Not Quite What I Expected

Recently I saw a craft project that looked so cool, so fun, so messy - just right for spending a quality afternoon together with Hannah. The idea was to dip yarn into a mixture of half glue, half water, and wrap it around a balloon. When it dries, you pop the balloon, and have an artsy string egg. So last night, Jonathan was working on an indoor home-improvement project that required the rest of us to be occupied in the dining room, and that seemed like the perfect time to bust out my yarn eggs. I could keep Hannah busy for an hour AND create some beautiful decorations just in time for Easter. (By the way, as opposed to other holidays, I do get into the whole decorating for Easter business.) But things did not go as planned. See if you can find the weak link in this project: I'd love to know exactly what went wrong!!! I started by getting out some yarn. The only pastel (read: Easter) colors I have are baby-weight...maybe that's where things started to go downhill. Anyway, I put the yarn on the table and started rummaging for glue and balloons. Within seconds, Hannah had the balls of yarn spinning all over the floor, mischievous kitten style. This actually flustered me enough that Jonathan had to leave his tools behind to come re-wind balls of yarn while I finished getting my supplies. Potential problem number two: my instructions called for "craft glue," and I used tacky glue. Is that craft glue, or am I supposed to use white school glue? And did they really mean for me to measure exact proportions of glue and water? I eyeballed it, but maybe I added too much water... Finally, we sat down at the table, where I about fainted blowing up tiny, cheap balloons. This was endlessly amusing to Hannah, but made me a little worried. You know, what if all that huffing and puffing made me go into labor or something?! So I cut a long piece of yarn, stuck it in the glue, and handed the end to Hannah. Immediately, she dropped it and asked for a wet wipe because her hands were "too sticky." I tried to explain that we were using glue, and it was supposed to be sticky, and isn't it fun to get a little messy, but Miss Neat and Tidy would have nothing to do with it. The most involved I could get her in the whole process was to wipe up my spills off the table with her wet wipe! Home improvement project complete, and the mess already cleaned by the world's only neat-freak two year old, I put the balloons aside to dry overnight. Apparently, something about the whole thing made an impression on Hannah, because all day, she's been asking me if we could play "Eggs-n-String" again. After re-thinking her adverse reaction, the whole bottle of glue I used up, and the fact that every time I went into the laundry room, the yarn was still soft and pliable (not hardened like I had expected), I decided that once was enough for this project. After Hannah went to bed, I went after the balloons with a pair of sharp scissors. I have to admit: the coolest thing about this whole project was the weird sucking noise the balloons made when I popped them and they detached from the yarn. You really should make one of these just so you can hear it! They look quite nice. But they are still very fragile. There is no way these are going to last in the attic until next Easter. (And I know about nursing things along. I just set out some real eggs I dyed and hollowed out five years ago that have been, so far, a permanent part of our Easter decor.) Like I said, I don't know if the problem is the light weight yarn, the type of glue, the glue-to-water ratio, or what. Maybe they weren't supposed to be hardy, long-term things in the first place. In any case, they are lovely, they kept us busy for an evening, and I learned that my daughter simply cannot abide by sticky fingers. Huh...

Tuesday, March 15, 2011

Crayon Redo - Crafting Green (and Red and Blue and Yellow)


We're moderately green at our house. Our weekly recycling bin is about equally full as our trash bin. We try not to use disposable plastic materials; for example, Jonathan and I have used washable lunchboxes for years in order to avoid putting our PB&J sandwiches into plastic baggies. We use cloth diapers...and even cloth training pants. We keep many of our appliances unplugged when not in use, and we have low-flow shower heads. I'll be the first to say that many of these green decisions were more influenced by economics than environment. But even while I'm not spending money on baggies and disposable diapers, I feel pretty good about reducing our environmental impact.

So choosing to have a "green" theme for the month of March is a little bit of a stretch for me. I don't usually think in terms of green. I thought about doing something green with Hannah, maybe taking some of the stuff out of our recycling bin and making something really cool out of it. Instead, during a long morning, we ended up making some re-molded crayons.

I know...not the most original thing in the world, but we did have a lot of fun. Hannah really enjoys coloring with the crayons that she helped to make. There are lots of really good instructions for how to do this out there, so I won't repeat them, but here are some colorful pictures of our project.


While many households have buckets of broken crayons, we don't. Maybe in a few years... Meanwhile, we gathered our few broken ones, and some off-brand crayons we gathered at restaurants, and got started. First, we peeled off he paper. This was surprisingly hard!


We broke the crayons (also harder than expected) and separated them by color.

These went into a mini muffin tin, where they were cooked in the oven...


...then cooled...


...then unmolded.


All in all, a lot of fun!
Related Posts Plugin for WordPress, Blogger...