Friday, May 20, 2011

Strawberry Picking


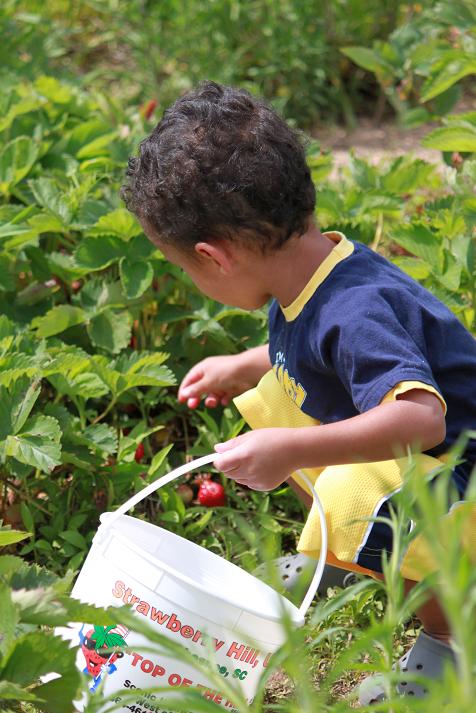
When I read on Facebook that some of our playgroup was going to pick strawberries yesterday afternoon, I wrote that off as someone who is going to have a baby in one week would just have to skip. As the day wore on, however, both the idea of going outside to do something and the idea of eating a bunch of strawberries sounded better and better. (What really happened was, I was asleep on the couch, and Hannah woke me up to say, "Mama, could we turn off the TV and play?" I felt so bad, I knew we had to do something!) So I bribed my wonderful husband to leave work for an hour and come with us. This was because I knew, with absolute certainty, that I could not bend over and actually pick the strawberries myself!


We went to the Fruit and Berry Patch, where we infamously took a long hike - uh - picked pumpkins last fall. This time, we drove right to the strawberry field...so easy!


It was a lovely day, and the kids had a good time, even though most of them didn't quite get the hang of choosing the "right" kind of strawberries. (Among the beauties were many over-ripe, unripe, and rabbit-eaten berries.) In the end, we all had buckets full of berries.


The plan for ours? Some freezer jam, pictures of which I hope to share with you soon.


Sunday, May 15, 2011

The Nursery!


At long last, and well before Little Sister is scheduled to make her appearance, her newly decorated bedroom is ready for her arrival! We put the finishing touches on the nursery today, and I'm so excited to share them with you!


In many ways, the nursery looks just like I'd imagined it. In others, it is quite different. I suppose this is like any large-scale project, isn't it? My original visions of lavender and pastel green turned into lavender and chartreuse. The plan for elephants everywhere became more of elephant accents. But I couldn't be more pleased with the way the room turned out.

The biggest thing we (and by we, I mean Jonathan) did this week was paint the walls. First went the lovely lavender of my daydreams - which these pictures do not do justice to, and then an ambitious striped pattern of a muted form of chartreuse. The taping for this was a beast.


Here's the room with all the furniture pushed to the middle to allow for painting (and a bonus for a nesting mom: I could vacuum under all the furniture!).


Today, we removed the tape, pushed the furniture back where it belonged, and had the fun of hanging pictures and accessorizing.


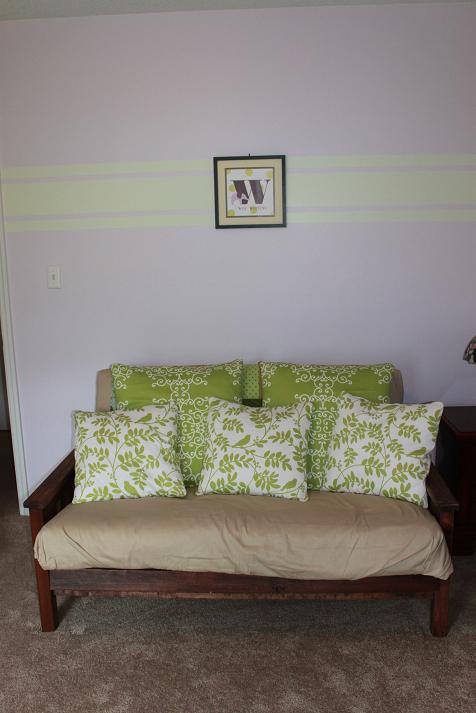
The futon (and this is where Grandma sleeps when she comes to visit), ended up in this room, so we tried to incorporate it with the rest of the room as much as possible. My original idea of some sort of elephant pillows turned into these green and white birds and vines. Not elephants, but I love them all the same!


The many elephant accessories are a collection of things from my own childhood, from Hannah's nursery, which was jungle themed, and from some general liking of elephants that Jonathan and share.


This mobile is something Jonathan and bought while traveling in Turkey before we were even married. To prove to you Jonathan's sentimentality, it was he who decided we should get this and put it away until such a time that we should need it. While not fancy, these little velvet elephants have a lot of charm. The hung over Hannah's changing table as well, and made diaper time fun.


Here's Jonathan's elephant mosaic in the foreground, and behind it, some carousel elephants from my past: a single elephant, and a small ceramic music box.


My grandmother was the original crafter, and this is one of the many, many things that she made. I don't know the technical terms for ceramic-making, but she had her own kiln, where she fired this. The animals turn round and round to the theme song from Sesame Street.


This wooden rocking elephant was a second-hand find of my mom's. It looks to be hand made, and is perfect for our elephant nursery.


The empty space above the crib is waiting the hanging of the baby's name banner. We even screwed in the hangers, hung the banner, and admired it for about twenty minutes before taking it back down and hiding in it its secret place. This will be the last detail added after Baby's name is revealed.

Saturday, May 7, 2011

Our Cinco de Mayo Treat: Mexican Wedding Cookies

Hannah and I bake cookies about once a week (sometimes more often, if they're chocolate chip and we find the cookie jar empty), and this week, we made Mexican Wedding Cookies in honor of Cinco de Mayo. Here is the recipe we used, and some pictures of us making them.

Ingredients:
1 cup butter, softened
1/2 cup powdered sugar, plus more for garnish
2 1/4 cups flour
1/4 tsp salt
1 tsp vanilla
3/4 cup chopped pecans

Preheat oven to 400.

Cream butter...


...and powdered sugar.


("Mama, can I taste some of this?")

Add vanilla. Mix salt with sifted flour.

Slowly add four to sugar mixture (about 1/2 cup at a time; stir well before adding more).

Stir in chopped nuts.

Using a teaspoon, roll into balls. Bake on a cookie sheet for 14-17 minutes.


We found that the cookies have very little spread, so you can put the quite close to each other. These are about one inch apart.


Cookies should be very lightly browned.


When cookies are cooled, roll in powdered sugar.


This recipe turned out dozens of tiny cookies, not very sweet, but with a wonderful toasted nut flavor. Beware: because they are small, it is very easy to unintentionally eat five of them while standing anywhere near the cookie jar!

Tuesday, May 3, 2011

Baby Name Banner


After my online search for the perfect purple elephant fabric, I went to the local JoAnn store and bought some fabric. As it turns out, none of it has elephants (in fact, some of it has birds), and most of it is not purple, but green. But I'm very happy with...

This fabric is destined to be throw pillows to liven up the futon that somehow found its way into Little Sister's nursery.


And this fabric is for some to-be-determined crafts, including a very cute name banner I finished today. The pattern for the banner is from a lovely book called Winsome Baby by Nancy Halvorsen.


Since Baby's name is top secret, I will not show you the whole banner, but here's a look at one of the letters, so you can get a sneak peak of what it's going to look like. (Also for those of you who are trying to figure out what the baby's name is, this will give you a small hint. As a reminder, it's a name from the Bible. I chose the letter "A" because it is intentionally obscure; this will eliminate a couple of names, but you will find that most woman's names in the Bible have the letter "A" in them...)


Next up for the nursery is painting, so we're looking forward to big changes coming soon!

Thursday, April 28, 2011

Cheapskate's Guide to Disney with Kids


My friend is planning a trip to Disney World with her two girls. The moment she told me she was thinking about the trip, I went home and dashed off an extremely long email containing all the good money saving ideas our family has developed from our own trips to both Disneyland and Disney World. She then suggested I share some of these tips on my blog, so here they are. For good measure, I've also added a healthy dose of family vacation pictures.

Let me say first that my main experience with Disney is at Disneyland. Growing up in Arizona, Anaheim was a reasonable 7 hour drive (which to a college student is "nothing" and I went more times in three years than I can remember). I've been to Disneyworld twice, and both times, spent most of my time in the Magic Kingdom because deep down, that's what Disney means to me. Finally, I've visited each park once with Hannah, when she was six months and when she was about 18 months. So I admit that I am uninitiated into the world of "Mama, I NEED to buy this!" but since I always find things that I NEED to buy, I think I can imagine the dynamics.

I also have a strong belief that, while it can be rewarding to save money on a vacation (think: if I don't blow $100 on porcelain princess figurines, we can stay at the hotel another night), I also think that vacation should include some fun spending. So each of my tips includes a section called "and because vacation isn't as fun if you're a total tightwad..."

Cheapskate Rule #1: Don't spend money on theme park food for breakfast and lunch. As far as theme parks go, the food at Disney is good, but it is expensive. Breakfast is obvious if you stay at a hotel that offer free breakfast. If not, bring your own breakfast foods from home (cereal and milk if there's a fridge; granola bars and fruit if there's not). Pack our own lunch and snacks and carry them with you. Good ideas for this is are a pb&j sandwich, chips, and an apple. You can't bring a cooler into the park, but you can bring your own food. (This is not advertised, obviously, but they won't stop you.)


Bring water bottles, which I think saves us at least as much as the food. You can fill you bottle at a drinking fountain, or if you're especially observant, find a self-serve soda fountain and ask nicely to fill your bottle with water. This is best, because you can get some ice too!

And because vacation isn't as fun if you're a total tightwad, eat out for dinner. This might be in the park, or at a nearby restaurant, but it is entirely unreasonable to expect people on vacation to live out of a mini-fridge. It's also fun to splurge on a snack each day. There are some really amazing choices for splurge-y snack foods. I recommend Mickey-shaped ice cream bars. Hannah recommends the Nemo cookies.


Cheapskate Rule #2: Don't buy clothes at the park. When you get to Disney, you immediately see that every other child - and adult - has on a really cute Disney shirt that would look so good in your family picture. You might plan to buy one shirt, but they're going to be upwards of $20, even for kids. And that will only last you one day. Buy Disney clothes before you go, or take with you any Disney clothes you already own. You can get new stuff at many, many stores. If you have bought new clothes, don't wear them until you get there so that they have that exciting feeling, and you won't be tempted to get new ones in the shops.

If you have princesses among your brood, bring all your princess costumes from home. If the daddy in your family hasn't been to Disney (or hasn't been in years), this is going to sound really crazy to him, but trust me. It is entirely reasonable for little girls to wear their best princess dress around the park all day. The other little girls will be wearing their princess dresses. Do you really want to be the Daddy shelling out $50 for a princess dress at the Bibbity Bobbity Botique? (Bring your tiara too, but leave the plastic high heels at home. The amount of walking you will do requires tennis shoes.)


There are also infinite possibilities about making your own crafty Disney outfits. Check out some other folk's craft sites or etsy shops: the possibilities are infinite. The last time we went, Hannah was decked out in her last year's Halloween costume.


And because vacation isn't as fun if you're a total tightwad, buy some Mouse Ears. To me, this is a non-negotiable expense. However, I do believe in bringing your ears with you each time you visit. Hannah has her own pink pair, I have some Minnie Mouse Ears I bought when I was about 16, and Jonathan wears a set he won during the Year of a Million Dreams.


Cheapskate Rule #3: Beware the gift shops. The first time I conned...uh...convinced Jonathan to go to Disneyland with me, my excitement was so contagious, that upon exiting our car in the parking lot, he shouted out "Let's go buy something!" (For those of you who know Jonathan, this is totally true, I swear. I still can't figure out what got into him, but can only guess that Disney sprays their entire property with odorless consumerism-inducing hormones.) You will feel this way too. So get ready before you go.

For kids, I have heard (but have not tested) a very smart theory: buy things at home, hide them in your suitcase, and distribute some of them each day. I heard a story of a mom who snuck back into the hotel room after the kids left for the day, set out the pre-purchased items, and upon return, said, "Look what Mickey left for you while we were out!" She easily herded the kids out of gift shops by reminded them that there would be a surprise from Mickey waiting for them that evening. In our family, this kind of surprise would probably be a stuffed animal from the local thrift store, where they are 4 for $1. We picked up an entire set of Winnie the Pooh characters for $1.50.

And because vacation isn't as fun if you're a total tightwad, budget some spending money for each person. (Then get ready to stick to it, because every ride exits into a gift shop, and that's not counting the cool big shops, and speciality shops, and street venders...) Jonathan likes to buy T-shirts. I like to buy Mickey Mouse cooking gadgets because the T-shirts don't fit me, so I plan to eat more when I get home. Hannah, as mentioned above, likes stuffed animals. You will find things you want. Remember the consumerism hormones? They're real.

Cheapskate Rule #4: Let the professional photographer take your picture...with your camera. Disney has this wonderful thing called PhotoPass, which includes photographers placed strategically at every place you'd like to have your picture taken. Like in front of the castle, by the lovely flowers, and the place where you stand in a hours-long line just for the purpose of having your picture made with Mickey Mouse.


They will take your picture with their camera, link it to a numerical ID, and at the end of your trip, you can buy a CD of all the pictures. Depending on the amount of pictures you take and how into scrap booking you are, this might actually be a good thing to buy. Otherwise, these PhotoPass people are more than happy to take a picture or two of your whole family with YOUR camera - absolutely free. It's worth asking. They won't cut off any one's head, because they really are good photographers. And you won't look back at your pictures and say, "I sure wish I had been in some of these, but I was the one always holding the camera."

And because vacation isn't as fun if you're a total tightwad, spurge on a single print of your family in front of the castle at night. Even though the PhotoPass people will take this shot with your camera, it won't come out because you don't have a tripod, and they won't put your camera on theirs.


A PhotoPass picture of me and Jonathan (pre-Hannah).


I tried to take a picture of the castle by myself by balancing the camera on a trash can to stablize it. The reflection you see is the top of the trash can.


In the end, a trip to a Disney park is going to cost you money, but there are a few things you can do to save here and there, and like I said before, if you're careful about being frugal in the right places, you might even save enough to stay an extra day. And what could be better than having a longer magical experience?

Saturday, April 23, 2011

Pink..uh, Purple...Elephants on Parade

Having picked up some of the mess in Little Sister's room, and not yet to the point of painting the walls, I've started contemplating what is going to go on the walls after the paint. I have all kids of fabulous ideas, from a quilt, to a name garland, to strings of embroidered elephants all in a row, trunk to tail.

My brilliant idea for this Saturday morning was to browse at the local fabric store for some purple elephant fabric. Then, half way through my bowl of cereal, it occurred to me that this would probably be a totally futile search. What are the odds of the fabric store actually carrying purple elephant fabric? Instead, I started searching online.

Boy, is there a lot of really awesome pink elephant fabric! And blue and green and yellow. Purple? Not so much...

Here's some of what I like:


This is from the Ele line by Premier Fabrics. I liked the motif when I saw it in Candy Pink and Chartreuse (not together...thank goodness!). So after some searching, I found this color, called "Bella." I thought I'd found the perfect thing, but upon further investigation, I realized that "Bella" is just another name for light pink.

Here's the Chartreuse, by the way.


I REALLY like this one, called Urban Circus, from Robert Kaufman. Why, oh why, is everything pink and green? (Why, oh why, is our nursery purple and green?)


This one is very cute, but has nothing whatsoever to do with my color scheme. It's called It's a Jungle Out There, by Hoffman Fabrics.


And this one's from the Bliss Flannel line from Free Spirit. Not quite purple either.


I guess that this point, I'm still leaning toward the Ele line...not sure if I would just pretend the light pink is lavender, or use the chartreuse and add my own purple accents. If anyone out there knows about some purple elephants, I would love to hear about them! And stay tuned. One of these days, there will be cute purple(ish) elephant stuff for Baby's room. I'm just as excited as you are to find out what it's all going to look like!

Saturday, April 16, 2011

Pottery Barn Ballerina Canopy Tutorial


For the last two months, I keep thinking about that Ballerina (Princess) Canopy I wanted to make for Hannah's room. I even started it weeks ago...only to have it sit in the sewing room collecting dust while I became a professional third-trimester couch potato. So this morning, when Jonathan said he'd watch Hannah all day so that I could do some sewing, this was the first project I picked. And not only did I finish the thing, but I've got a tutorial to share with you.


My original idea was to make this myself because Pottery Barn charges $150 for their canopy. I wanted to make a similarly cute canopy, but not pay so much. I think I succeeded. I made the doll using materials I had on hand, but even if you were to buy fabric, stuffing, thread, and yarn, you'd probably spend about $8. The wooden quilting hoop I used for the canopy's structure cost $4. I spent $.25 for a sheet of craft felt for the bodice and crown. The tulle was really the greatest cost. I waited for a sale, where I bought 34 yards of tulle at $.77 a yard. I ended up using 20 yards, meaning $15.40 of tulle. So total cost for me was less than $20. Not counting this enormously long blog post, I'm guessing I spent fewer than 10 hours on the project.

Let me say first of all that along with being a procrastinator, I am not a perfectionist. My motto is most definitely, "good enough is good enough," which you will discover if you look at these pictures carefully enough. But you know what, it's good enough, and I hope that yours is much more beautiful than mine. (Like maybe if you run out of pink thread, you'd go get some more instead of using glaringly out of place white thread.)

One more disclaimer: some of the pictures were taken in pretty bad light. This is because my "sewing room" is actually a desk crammed into the corner of the laundry room, which is lit by one light bulb. So I have some lovely pictures I took at the dining room table, lit by actual sunlight, and some pictures that look like I was working in a dark room, which I was.

This is the longest, most complex tutorial I've done, so I hope it is understandable. To help with this, I've broken it into five main sections:

1. Doll

2. Hair

3. Pink Dress

4. While Canopy

5. Assembly


1. Doll: I used a generic outline for a doll head/body with arms, which measured about 15 inches. I made this from white muslin, cutting two pieces.


a. Sew the front and back pieces together. Clip curves and turn.


b. Stuff, stuff, stuff. I use regular polyester craft filling. Even when you think you have stuffed it enough, stuff some more.

c. Sew up the bottom. I folded under the bottom seams to make a neat seam.
2. Hair. The original Pottery Barn Ballerina Canopy has super cute, in-style hair. I'm not a yarn hair stylist, so mine looks a little more like Granny from the folk art doll I made Hannah last year (yep...thanks for the inspiration, Granny!) However, I did have some lovely yellow yarn, so that looks nice. (Her bun and crown were added last, so instructions for those are later.)

a. Cut a 10 inch piece of cardboard. Wrap the yarn around it 30 times.


b. Keeping the yarn straight, slide it off the cardboard. Machine stitch along the center of the yarn.


c. Cut the yarn opposite the seam.


d. Using matching yarn, sew the hair to the doll's forehead, about one inch below the top seam. I used a darning needle for this, just because it's easier to thread. (This is a picture of the doll face-up.)


e. Flip the hair to the back of the head. Tuck the loose ends of the hair under (lengths will be uneven), and sew along the nape of the neck, using matching yarn.


If necessary, sew a stitch or two where the ears would be, to keep the hair out of her face. (The Pottery Barn Canopy actually has ears, but I figured that less is more.)


f. This isn't actually hair, but this is when I embroidered the face on. This is probably the thing I was the least happy with, so if you make one of these, I'd love to see a picture of how yours turns out.
3. Pink Dress. To keep things simple (and less expensive), I made the bodice of the dress from felt, rather than sewing a real dress. Since this is going to be hanging from the ceiling, and not actually played with, I figured that looks matter more than durability.

a. Make the bodice the same size as the doll's body, sleeveless, and with a scalloped neckline. Cut the front and back the same.


b. Whip-stitch the shoulders together first, then slide it over the doll's head before whip-stitching the side seams. Leave the bottom open.


c. The skirt is made from tulle. I originally bought 16 yards of tulle, intending to make the skirt a four-layer affair, but at the last minute, I decided to go with two layers. It definitely could have handled all four layers, and if you want a really full look (or if you're using a very light pink), go ahead and use the extra fabric. The truth: I cheaped out. I thought the extra 8 yards were too expensive, and I hoarded them away for a future tutu.

Keeping the tulle folded in half lengthwise, sew a long seam about 1 inch from the center fold. Use a long basting stitch. This forms a tube for gathering the skirt. (This is where the obvious white tread comes in...) Let me tell you: sewing 8 yards of fabric takes FOREVER!!!


d. Gather the skirt by pulling a length of ribbon or cording through the tube you just made. This is made easier by attaching a safety pin to one end of the ribbon. I anchored the other end by tying it to my scissors. I cut two feet of ribbon, which was plenty.


It really doesn't look like that much when it's all gathered together!


e. Adjust the ribbon so that it just fits around the bottom of the doll's body. Tie the ribbon. Spread the gathers evenly around the length of the skirt. Using small hand stitches, attach the skirt, making sure to catch the ribbon in your stitches.


At this point, Hannah kidnapped the doll and danced though the house with her. It was pretty cute...
4. White Canopy. This is the shortest bit to explain, but probably took me the longest. Most of this was spent decided how long to make the canopy. The Pottery Barn Ballerina Canopy is a total of 107 inches long, according to their website. My canopy began about 24 inches from the top. Jonathan and I engaged in much discussion, and finally decided to make the white panels 5 feet long, which makes my canopy hang nicely around the edges of Hannah's toddler bed.

During this discussion, we realized that this would depend on how high your ceilings are. Ours are 8 foot ceilings; if yours are 10 foot, you'd want longer white panels. After I finished the whole thing, we decided not to hang it over Hannah's bed because she'd probably pull it down while she was NOT sleeping (one of her favorite past times). We tried it out over her coloring table, where it was quite far from the floor (like 18 inches). The moral is, really think about how long you need this to be for your space before you start cutting!

a. The hoop that gives the canopy definition is the inside of a 24 inch wooden quilter's hoop. This works well because it is light weight, and relatively inexpensive.

b. It took seven panels of doubled-over tulle to go around my hoop (each panel was left folded along the center fold.) I cut each panel to five feet long (see above.)

c. Using hot glue, attache the tulle, creating pleats that are approximately 6 inches wide. This creates a three-layer ruffle (across, back, and across again).


5. Assembly. After making all the pieces, putting it all together was pretty exciting. I was a little stumped about how to attach the doll to the hoop, and finally decided to raid Jonathan's tackle box and do it with fishing line. This worked really nicely, because it was "invisible," and it tied in really nice knots.

a. Attach the doll to the hoop. Begin by laying the doll with her skirt wrong-side-up on the work surface. Lay the hoop with the canopy wrong-side-up over the top of the skirt.


b. Cut four, three foot lengths of fishing line. Using a sewing needle, attach one length of fishing line to the center of the bottom of the doll's body. Secure with knots.


b. Make the first spoke by measuring 12 inches between the doll's body and the hoop, attach the fishing line to the hoop. Repeat for the other end of the fishing line, opposite from the first spoke. If necessary, use a sewing needle to bring the fishing line through the white tulle at the edge of the hoop.


c. Repeat this process three more times, making eight spokes equal distance from each other.

d. When you turn the doll over, the skirt should fall over the hoop, with the canopy inside of it.

e. Make the doll's bun by winding a ball of yarn, about 1 inch in diameter.

f. Make the crown using a scrap of felt used for the bodice. My crown was 1 inch high and 5 inches long. Attach the crown to the bun using hot glue.


g. Make a loop for hanging the canopy using fishing line. With a sewing needle, attach the fishing line to the top of the doll's head through the hair (do not attach the fishing line to the hair itself - it's not strong enough to hold all the weight.) Tie at the top to create a loop.


h. Hot glue the bun/crown to the hair over the place where the fishing line is attached, at the top and center of the doll's head. Make sure to leave the fishing line free for hanging the canopy.


And there you have it! I was so excited to finally finish this, that I danced a jig. Hannah was estatic that she had this wonderful doll/tent/awesomness for her room.


In spite of the picture of Hannah sitting under the canopy, we didn't actually hang it today. We're still trying to decide where it should go, since we ruled out over the bed. Maybe this is just as well, since ballerina/princess canopies don't really go with Elmo sheets anyway...
Related Posts Plugin for WordPress, Blogger...